PLOSSYS Mobile Client
Introduction
With the PLOSSYS Mobile Client, you can use your PLOSSYS Output Engine even more flexibly. The app allows you to start print jobs directly from your mobile device via PLOSSYS Output Engine and PLOSSYS Print Client. This enables you to design your mobile printing processes efficiently and securely. The focus is on seamless integration into your existing corporate infrastructure and meeting modern requirements for security and user-friendliness.
System Architecture
┌─────────────────┐
│  Mobile Client  │
│   (Flutter App) │
└────────┬────────┘
         │ HTTPS (OpenID Connect)
         ▼
┌─────────────────┐
│     Operator    │
│   (SEAL Server) │
└────────┬────────┘
         │ IPP
         ▼
┌─────────────────┐
│  Output Engine  │
└────────┬────────┘
         │ Print Jobs
         ▼
┌─────────────────┐
│     Printers    │
└─────────────────┘
Hint - no direct Output Engine connection
The Mobile Client communicates only with the Operator. There is no direct connection to PLOSSYS Output Engine.
Requirements
-
iOS 15.5 and newer
Caution - no App Store link
PLOSSYS Mobile Client currently has no public App Store listing. Contact SEAL Systems for the current iOS distribution channel.
Hint - supported Operator versions
The Mobile Client can connect to any SEAL Operator instance (version 1.6.0 or later) as long as the Operator is correctly configured with OpenID Connect and the user exists in the identity provider. No additional Operator-specific configuration is required for the Mobile Client.
Key Features
-
Mobile printing: The app allows you to send print jobs directly from your mobile device to company printers. You can use files on your smartphone or share output data from other apps via PLOSSYS Mobile Client.
-
Pickup printing: Print jobs are stored and only released at the printer once the user has authenticated themselves. Pickup printing increases the security of confidential documents and helps to reduce unnecessary printing.
-
Document verification: The app checks whether a printed, OptiHash-sealed document is authentic or has been tampered with. You start the check from
Exploreand scan the QR codes printed around the document with the camera. The check runs fully on-device. No network access is needed. This is an optional feature. An administrator enables it via MDM. Refer to Document Verification for details. -
OTP-protected pickup: The app can require an OTP step before a pickup job moves to a printer. This adds a security layer for confidential print jobs. This is an optional feature. An administrator enables it via MDM.
Hint - MDM-managed features
Document verification and OTP-protected pickup are advanced capabilities. In production, both are off by default. An administrator enables them via MDM. Refer to Configuration via MDM.
Application
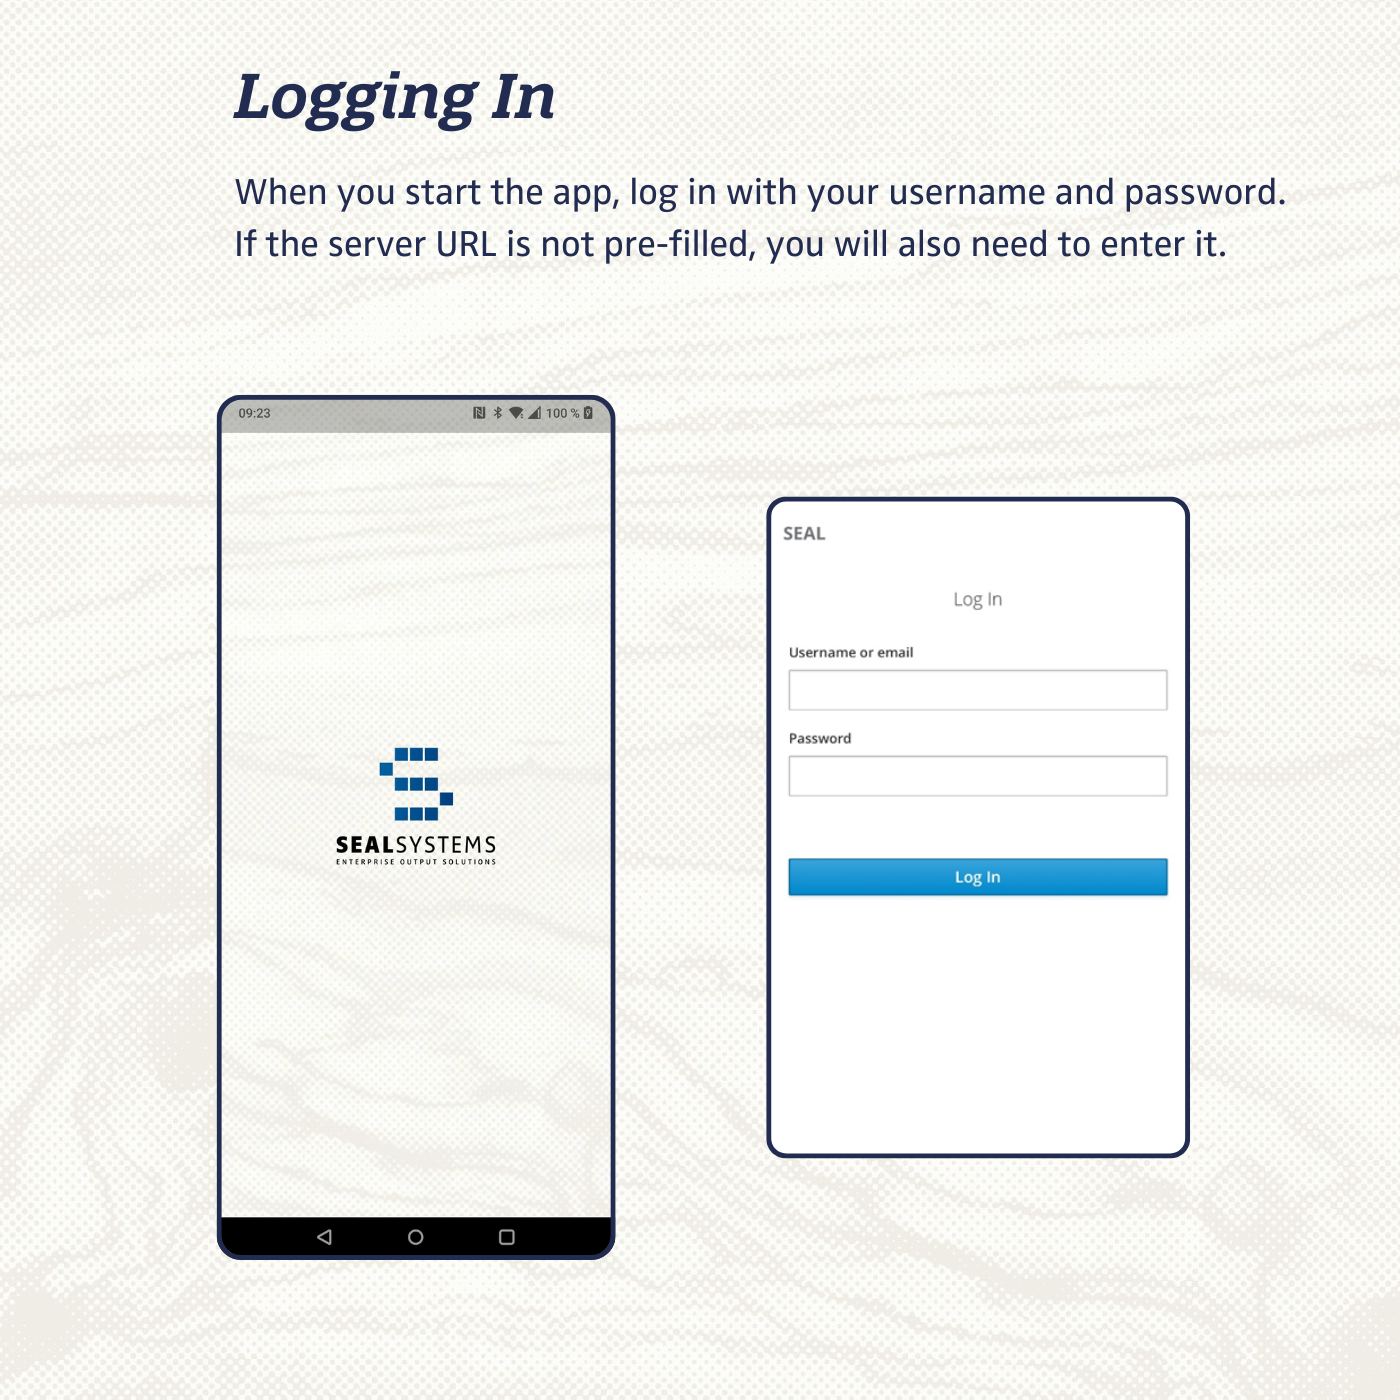
- When you start the app, log on with your user name and password. If the server URL is not pre-filled, you will also need to enter it.
-
On the
homepage, you will find jobs that are currently being printed and your most recently printed ones. For a complete list of all your printed jobs, click onView allat the bottom right.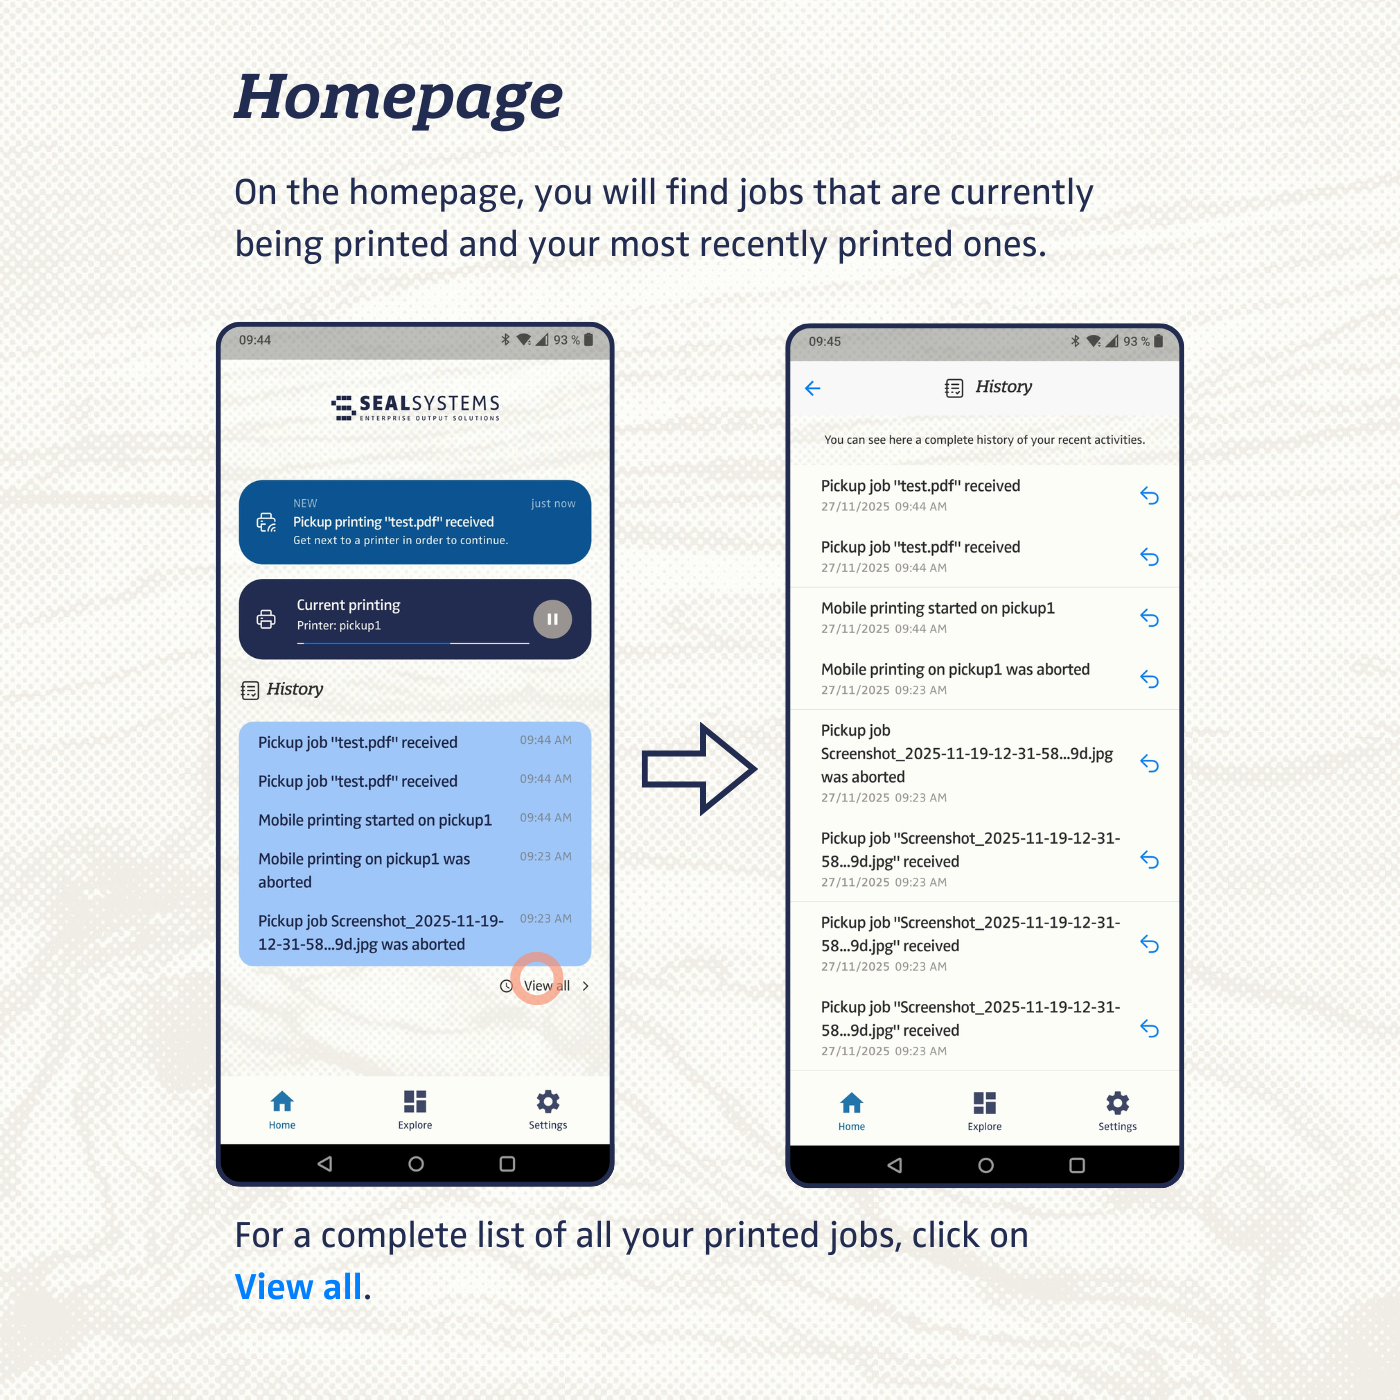
-
The
Explore menuitem provides an overview of the functions. To receive a pickup job, click onPickup Jobsand scan the QR code on the printer to start printing. If an administrator enabled document verification via MDM,Document verificationalso appears here. Refer to Document Verification.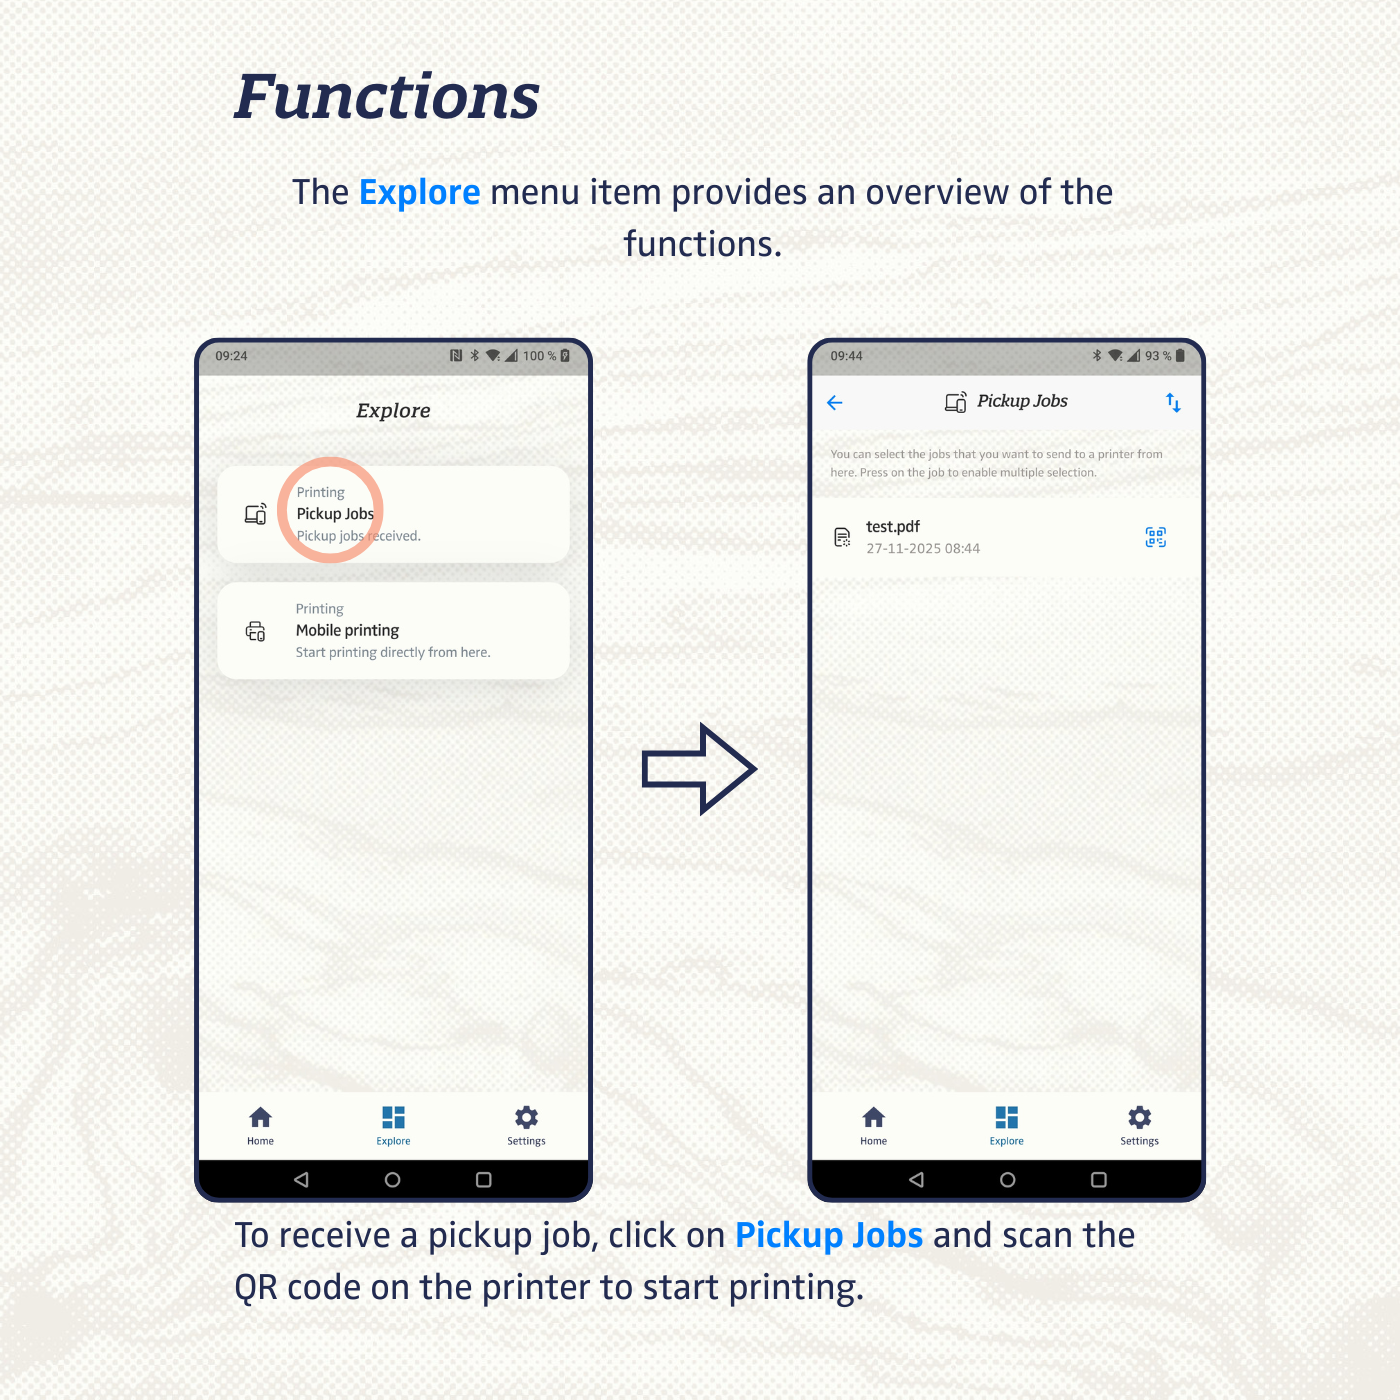
-
To start a print job directly, select
Mobile Printing. You can upload one or more files here.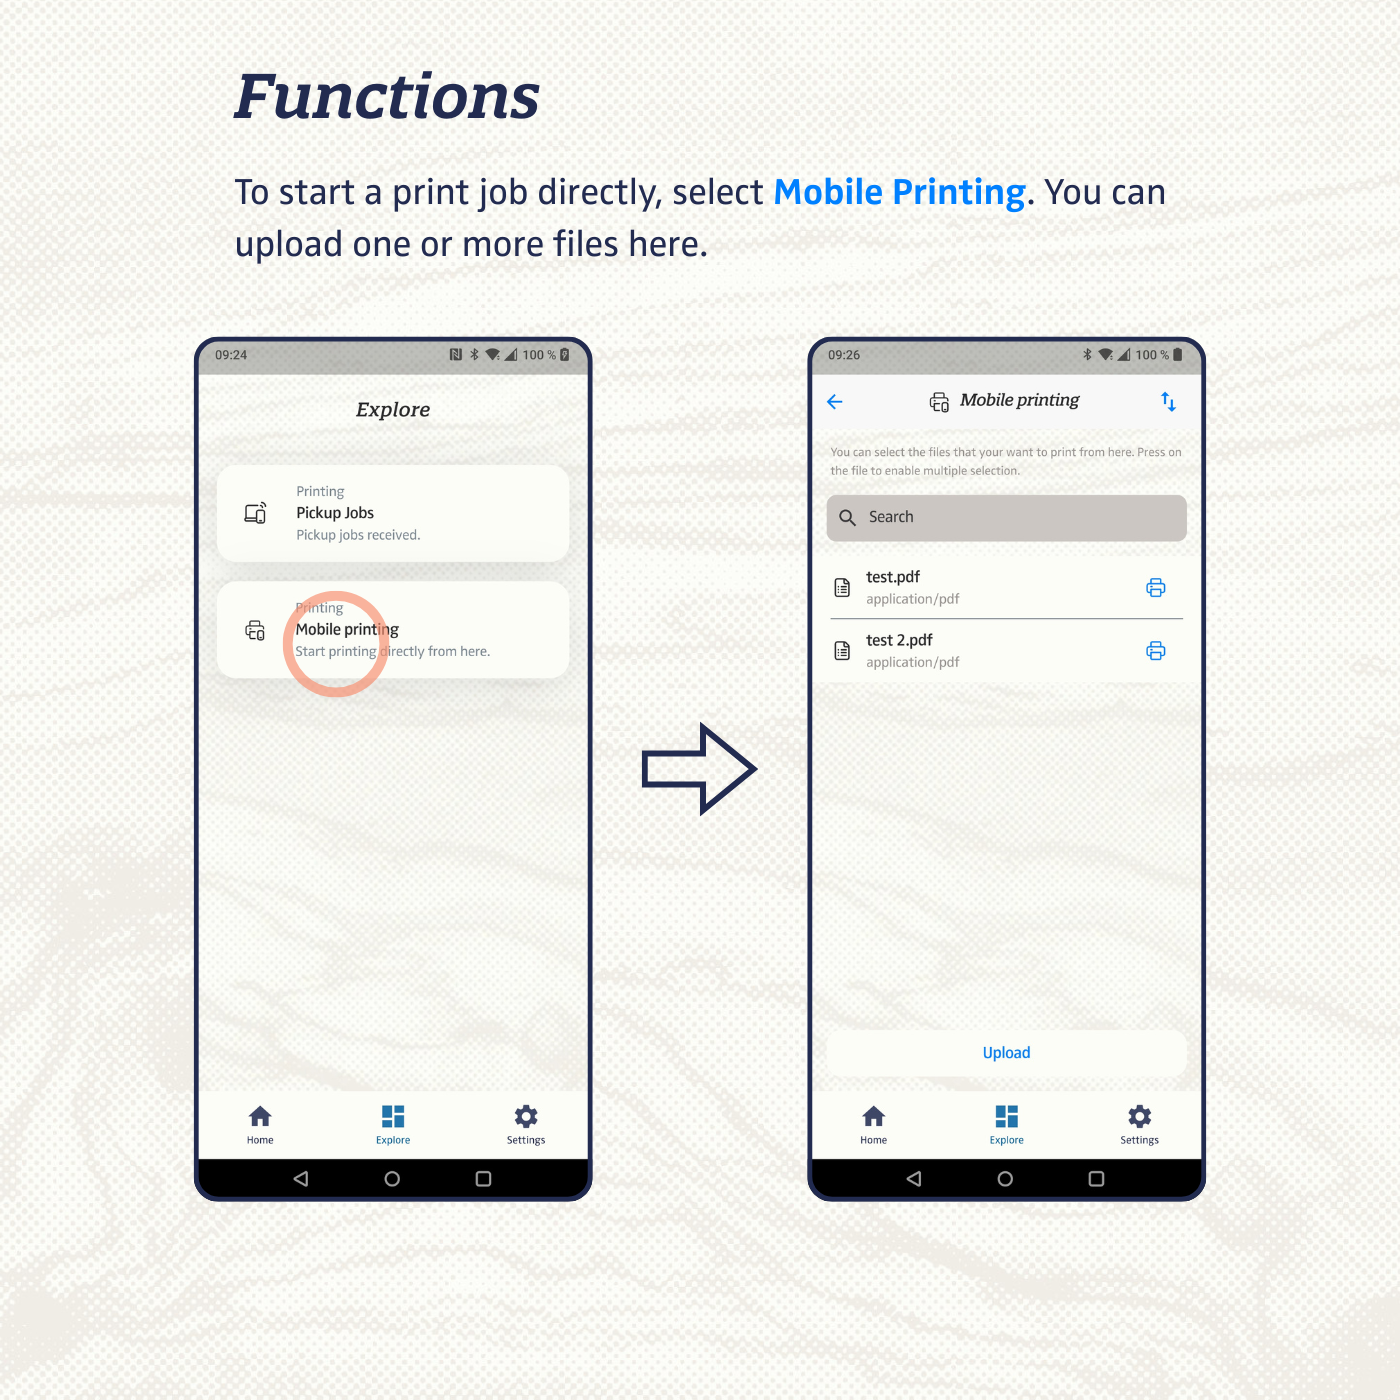
-
Language, system design, printer settings, and server connection are managed via the
Settingsmenu item. You can choose English or German as language.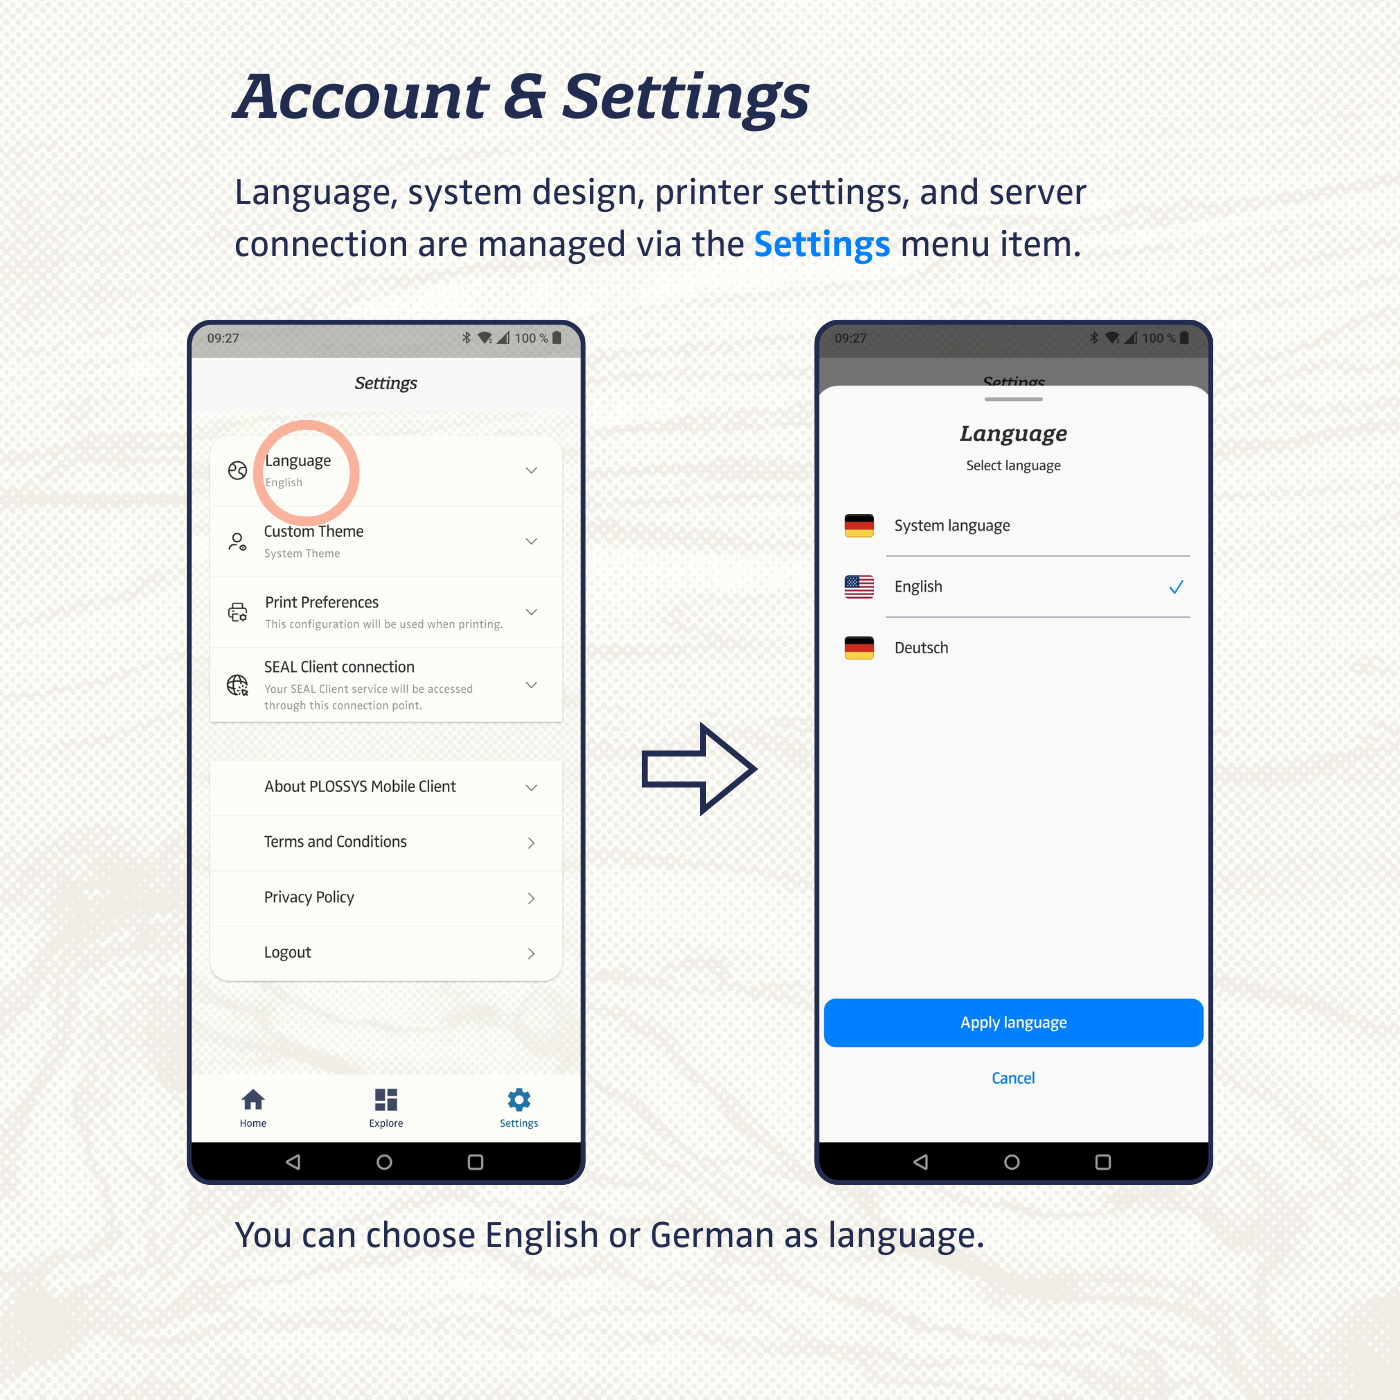
-
Under
Custom Theme, you can choose between light or dark design for the app.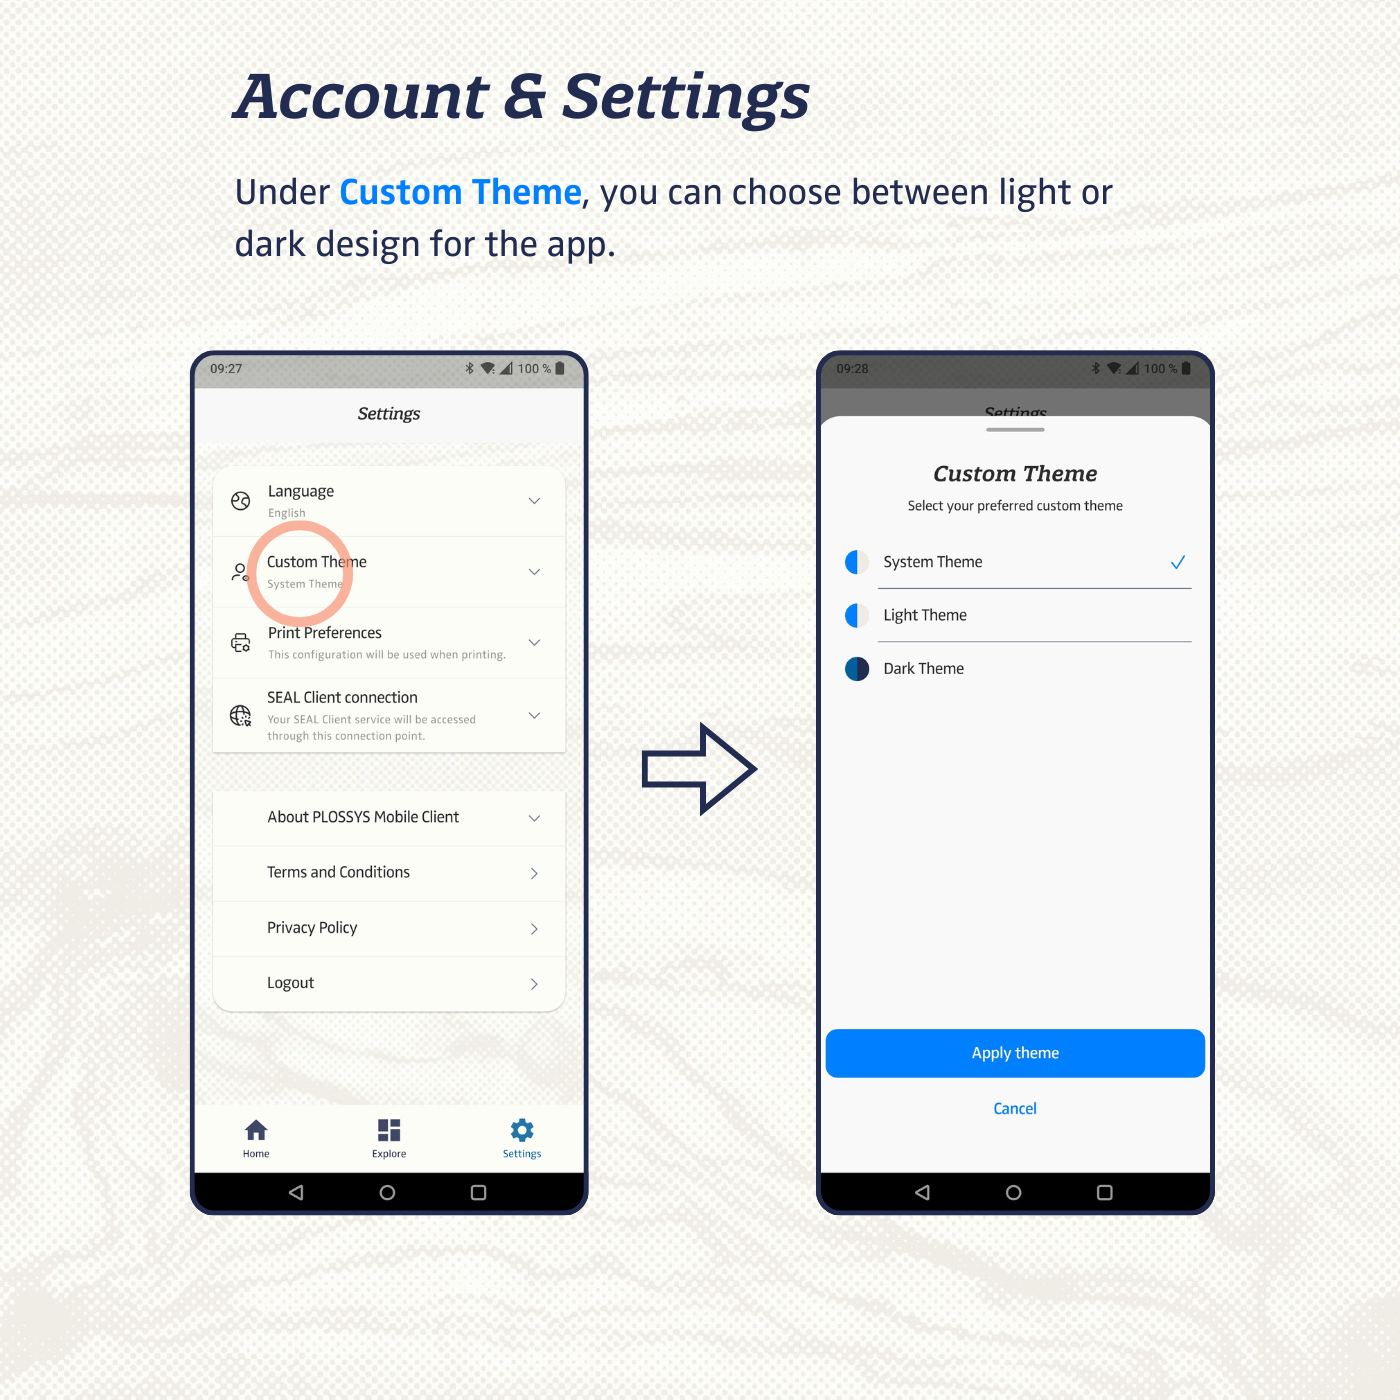
-
Under
Print Settings, you can set the defaults for color mode, duplex printing, number of copies, etc.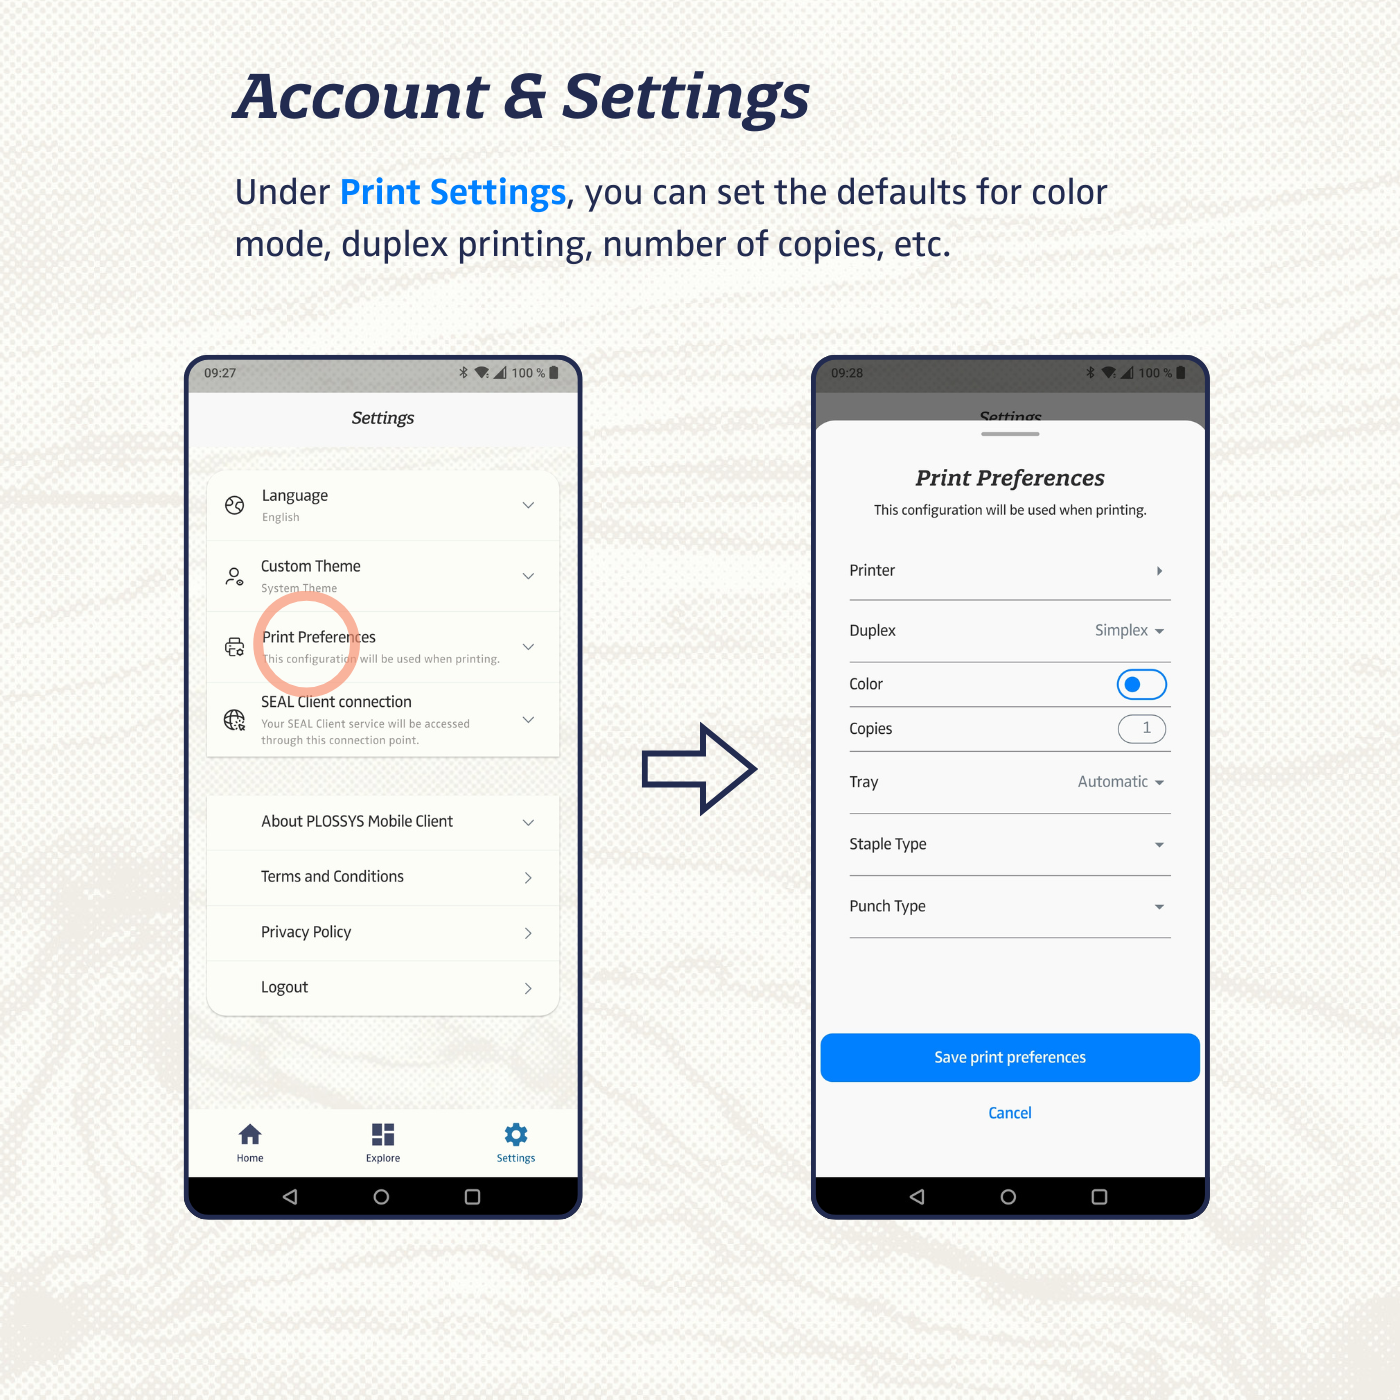
Document Verification
Document verification lets you check whether a printed, OptiHash-sealed document is authentic, without a network connection.
-
Open
Exploreand tapDocument verification. -
Point the camera at the document and tap
Scan QR. The app scans the QR codes printed around the document and collects codes from them. -
Once the app has collected enough codes, it verifies the signed payload on-device.
-
The app checks the protected document regions with OCR.
-
The app shows one of these results:
Authentic: the document codes are valid and the checked content matches.Tampered: one or more checked areas do not match the document codes.Inconclusive: the app could not determine a result. Scan again with the full page visible.
Caution - single issuer only
Document verification currently verifies documents from a single, fixed issuer only.
Configuration via MDM
Example (iOS)
To configure the app via MDM, provide the following keys in your Managed App Configuration (Apple Plist format):
<?xml version="1.0" encoding="UTF-8"?>
<!DOCTYPE plist PUBLIC "-//Apple//DTD PLIST 1.0//EN"
  "http://www.apple.com/DTDs/PropertyList-1.0.dtd">
<plist version="1.0">
  <dict>
    <key>sealClientUrl</key>
    <string>https://demo.operator.sealsystems.local/server-api/v1</string>

    <key>allowManualConfigFallback</key>
    <string>false</string>
  </dict>
</plist>
| Key | Type | Required | Default | Description |
|---|---|---|---|---|
sealClientUrl |
String | Mandatory unless manual fallback is used | (empty) | Base URL of the Operator server. Must include /server-api/v1. |
allowManualConfigFallback |
Boolean (true/false) |
Optional | true |
If true, the user can enter the Operator URL manually in the app. Set to false to enforce the MDM-provided URL. |
authUrl |
String | Optional | (empty) | OIDC discovery/realm URL of the identity provider. Falls back to manual entry in the app if omitted. |
clientId |
String | Optional | (empty) | OIDC client ID configured in the identity provider. Falls back to manual entry in the app if omitted. |
advancedCapabilities |
Boolean (true/false) |
Optional | false |
Shows the Advanced Capabilities section in Settings and lets the user toggle the features below. If false, the section is hidden and the features are controlled entirely by MDM. |
documentVerification |
Boolean (true/false) |
Optional | false |
Enables guided document verification. With advancedCapabilities set to true, this becomes a user toggle, on by default. With advancedCapabilities set to false, this value is enforced. |
otpAuth |
Boolean (true/false) |
Optional | false |
Requires OTP authentication when moving print jobs. With advancedCapabilities set to true, this becomes a user toggle, on by default. With advancedCapabilities set to false, this value is enforced. |
Hint - manual entry fallback
If authUrl and clientId are not provided via MDM, the user must enter them manually in the app. The allowManualConfigFallback key controls whether manual input is permitted at all.
Hint - advanced capabilities
On production, all three advanced-capability keys default to false. On non-production flavors, they default to true and are user-toggleable.
Hint - sealClientUrl
Base URL of the Operator server (must include /server-api/v1). If the Operator is exposed on a custom port, include it in the URL, e.g. https://
Authentication (OpenID Connect)
The app uses the OAuth 2.0 Authorization Code Flow with PKCE (S256) as a
public client.
| Parameter | Value |
|---|---|
| Protocol | HTTPS |
| Auth Method | OAuth 2.0 Authorization Code Flow with PKCE (S256) |
| Client type | Public (no client secret) |
| Discovery URL | {authUrl}/.well-known/openid-configuration |
| Client ID | Configured via MDM or manually (e.g. seal-plossys-mobile-client) |
| Scopes | openid, profile, email |
| Token storage | flutter_secure_storage |
The required runtime values are provided either via MDM or entered manually in the app:
sealClientUrl– Operator server base URLauthUrl– OIDC discovery/realm URLclientId– OIDC client ID
Hint - authUrl format depends on Keycloak version
The format of authUrl depends on the Keycloak version in use.
Up to Keycloak 17, the path includes /auth:
https://<server>/auth/realms/SEAL
Starting with Keycloak 21.0.1, the /auth segment has been removed:
https://<server>/realms/SEAL
Keycloak Client Configuration
This section describes how to set up the required Keycloak client for the PLOSSYS Mobile Client.
1. Create Client
In Keycloak, navigate to Clients → Create and set:
- Client ID: e.g.
seal-plossys-mobile-client - Client Type:
OpenID Connect
2. Access Settings
- Access Type:
public - Standard Flow:
ON - Implicit Flow:
OFF - Direct Access Grants:
OFF
3. PKCE
In the Advanced settings, set:
- Proof Key for Code Exchange Method:
S256
4. Redirect URIs
Add the following redirect URIs for all supported app variants:
| Variant | Redirect URI |
|---|---|
| Unlisted / Beta iOS | de.sealsystems.plossysmobileclient://oauthredirect |
| Production iOS/Android | de.sealsystems.plossysmobileclient.public://oauthredirect |
| Staging / Beta Android | de.sealsystems.sealprint.stg://oauthredirect |
5. Client Scopes
If not already provided by realm defaults, configure the client scopes as follows:
Assigned Default Client Scopes:
emailprofilerolesweb-origins
Assigned Optional Client Scopes:
addressoffline_accessphone
6. Client Roles
In the client seal-plossys-mobile-client, navigate to Roles → Create and
create the following role:
seal-print-client-user
Assign this role to all users or groups that should be allowed to use the Mobile Client.
Hint - missing role mapping
Without the seal-print-client-user role mapping, logon can succeed at Keycloak but the Operator will return 403 Forbidden.
Operator Server Configuration
To allow the Mobile Client to access the Operator, add the client to
ALLOWED_OIDC_CLIENTS in the Operator configuration:
{
  "seal-plossys-mobile-client": {
    "roles": {
      "seal-print-client-user": {}
    }
  }
}
The client ID used here must match the clientId value configured in MDM or
entered manually in the app.
Base URL Configuration
- MDM (preferred) – Key:
sealClientUrl, retrieved via platform channel - Manual fallback – Enabled via
allowManualConfigFallbackin MDM
The behavior depends on the allowManualConfigFallback MDM key:
| Value | Behavior |
|---|---|
true |
The user may override the MDM-provided URL with a manually entered one. |
false |
The MDM-provided URL is enforced. Manual input is not permitted. If the managed URL is invalid, the app shows an error screen and cannot proceed until a valid URL is pushed via MDM. |
Manual Configuration
If no MDM configuration is present, or if allowManualUrlConfigFallback is set
to true, the user can configure the connection manually in the app.
The following values must be entered manually:
- Auth URL – OIDC discovery/realm URL of the identity provider
- Client ID – OIDC client ID
- Server URL – Operator base URL
The app validates each value before proceeding. If a value is invalid, an error is shown and the logon is not opened.
Changes to Auth URL or Client ID in the app settings will log the user out and require a fresh logon. A change to the Server URL alone does not trigger a logout, provided the new URL is reachable with the existing session.
API Endpoints
Service Discovery
GET /ui → Discover services (finds operator-p5)
Tasks (/services/operator-p5/tasks)
POST   /tasks                    → Create print task
GET    /tasks/{taskId}           → Get task status
POST   /tasks/{taskId}/action    → Start / pause / resume / abort
POST   /tasks/{taskId}/input     → Add file input
GET    /tasks?status={s}&embed=metadata
Pickup Jobs (/services/operator-p5/function/)
POST  getPickupJobs              → List pickup jobs
POST  moveJob                    → Move job to printer
POST  fetchJob                   → Get job details
POST  pauseJob / resumeJob / abortJob
POST  getOtpSeed                 → Get OTP seed
Printer & Config
POST  getCapabilities?params=Printer::{printerId}
GET   /services/operator-p5      → Service config schema
GET   /ui/{serviceId}            → Print config schema
POST  /function/{providedBy}     → Get printers / provided items
File Upload (/services/operator-fileupload/)
POST  /repo                      → Create file repository entry
PUT   /repo/{uuid}/content       → Upload file content
Communication & Error Handling
- All traffic: HTTPS, Bearer token authentication
- Token is refreshed automatically on expiry
| HTTP Status | Behavior |
|---|---|
| 401 / 403 | Automatic logout |
| 500+ | Error toast (rate-limited) |
| Network err | Connection error message |
Hint - self-signed certificates
The Mobile Client relies on the mobile operating system for HTTPS certificate validation. If the Operator server uses a publicly trusted CA certificate (for example Let’s Encrypt), the Mobile Client works without any additional configuration. If a self-signed or privately issued certificate is used, the corresponding root certificate must be installed on the devices (typically via MDM or manual root certificate installation) so that the app can trust the Operator server.
Session Management
The app does not store user credentials. Session lifetime is controlled entirely via Keycloak.
| Setting | Description | Default |
|---|---|---|
| Access Token Lifespan | Validity of a single access token. The app refreshes it automatically on expiry. | 10 minutes |
| SSO Session Idle | Maximum inactivity period before Keycloak expires the session. | 7 days |
| SSO Session Max | Absolute maximum lifetime of the SSO session, regardless of activity. | 30 days |
The access token is short-lived but the app keeps the user logged in by refreshing tokens automatically while the Keycloak session remains valid. Once the SSO session or refresh token expires, or if a refresh attempt fails, the app logs the user out and requires a new login.
All three values can be adjusted directly in the Keycloak client settings.
Ports
Ports are part of the Operator URL – no separate config needed.
| Setup | Example URL | Port |
|---|---|---|
| Standard HTTPS | https://operator.example.com |
443 |
| Custom port | https://operator.example.com:8443 |
8443 |
Hint - required network access
The app only requires access to the externally reachable Operator and Keycloak URLs. No direct access to Output Engine, printer, or internal service ports is needed.